
Let's Photograph the Night Sky
...with Minimum Gear and Budget
From a Novice to Novices
This article is posted in the hope it will stimulate the fascination for the night sky which inherently resides in all of us. This article focuses on cost-efficiency and low budgets. It is a hobby which can not be enjoyed every day, because, besides availability of free time, it relies on the phases of the moon, weather and atmopsheric condition. Some say that people spending nights under the sky do not socialize. Try carpooling with friends and like-minded people and head out together for a dark sky site.

Hobby astrophotography with a telescope and a DSLR must not tribute lots of money and effort. Much of the required gear is available second hand, while no equipment on Earth can deliver Hubble Space Telescope images anyway. Do not get seduced to buy a telescope that is showcased next to a Hubble poster. Please do not screw your expectations up too high and start step by step with a low budget like walking in a mine field. Your first images won't be able to compete with the results of experts with years of experience, but you will cherish your first achievement. Astrophotography is one of the most difficult, unforgiving, but also most rewarding kind of imaging in return for patience and devotion.
Tracking Mount
The most important gear is a 'German Equatorial Mount' which follows the apparent motion of the sky as a result of Earth's rotation. You can keep the budget for a mount low by using a light-weight telescope. The price for a mount increases with sturdiness, payload capacity, tracking accuracy, as well as extras, such as GPS or WiFi. If you keep the payload low and choose short exposure times, say, under a minute, then accuracy is not a serious issue while you will get a sturdy mount under USD 1,000 new or find a second-hand deal for less.
The difference between tracking and guiding being is, the mount motors track the sky motion to keep an object within the eyepiece field of view, while additional guiding is performed by means of a computer controlled CMOS camera which follows a bright guide star in its view and regularly feeds its position to the mount for compensation in case of drift in order to increase tracking accuracy for longer exposures. Guiding is not essential for the first steps or very short focal length lenses.
Select a mount with sufficient payload capacity. Your OTA plus gear should not weigh more than 70% of the specified load capacity in order to have plenty of buffer for assuring tracking accuracy. As a rule of thumb, refractors up to 80mm aperture weigh up to 2.5kg, 80mm refractors weigh up to 3.5kg. A 5-inch (Ø130mm) Newtonian weighs about 3.5kg, a 6-inch (Ø150mm) brings about 6kg onto the scale.
Optical polar alignment of an equatorial mount with a built-in polar scope requires an unobstructed line of sight towards a celestial pole, while modern electronic software algorithms are capable of performing this alignment without view at a pole. This requires a dedicated CMOS camera, such as a 'planetary camera' and PC capture software for controlling the alignment process.
Another type of mount is the altitude-azimuth mount which compensates first in one direction, then in the other. It is aligned to the horizon, not to the pole. This will generate blurred objects (field rotation). However, if you limit the exposure time to, say, 30 seconds then you might be happy with what you get. If you do not yet own a mount by all means pick a German Equatorial design for photography. An altitude-azimuth mount if fine for visual observation through eyepieces.
Telescope
The more aperture a telescope has the more detail you can capture. The difference to smaller scopes is often like that of a $100 bottle of wine and a $4.99 bottle of wine. Since a wide field and fast optics (provided by short focal lengths) are preferable for imaging deepsky objects, such as nebulae and star clusters, a refracting telescope or a reflecting Newtonian are the primary candidates. Fully multi-coated lenses or optically treated mirrors of good quality provided, small apertures starting from Ø60mm for lenses and Ø130mm for mirrors will be quite sufficient, also considering the capabilities of modern DSLRs and image processing software. Prices increase 'exponentially' with growing aperture and with optical quality as production becomes more demanding. Also, telescopes are not manufactured in lots of millions, not even in China, reflecting into sales prices. Telescopes often require the preparedness to compromise - in more ways than one. In December 2018, a Japanese astronomer discovered the faint comet C/2018 Y1 (Iwamoto) with only a Ø100mm lens.
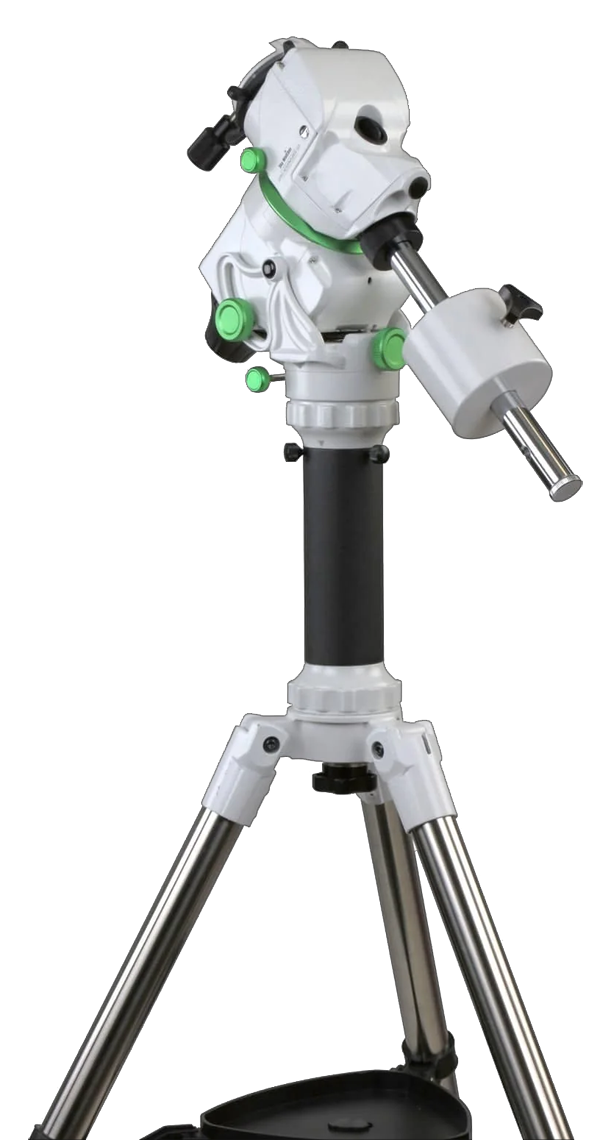
EXAMPLE: Sky-Watcher Star Adventurer GTi, a budget mount for up to 5kg payloads, such as a DLSR with lens or a small refractor, supporting PC control via USB or Wi-Fi with an app and autoguiding in both directions. It includes a polar scope and is sold with or without a tripod (around USD 750.00 including tripod, around USD 650.00 without tripod, as of March 2025). A newer model with up to 10kg payload is the Sky-Watcher EQ-AL55i Mount which includes a tripod (around USD 750.00, as of March 2025).
• Refractors (Achromatic)
Low cost, short focal length (fast) refractors typically sport a doublet lens (aka Fraunhofer achromat) which produce notable color and comatic aberration resulting in blue and red halos around bright objects and elongated stars in the edges of an image, respectively. Color fringes rob contrast and valuable detail that a large lens could theoretically provide. Refractors which correct or minimize such optical errors (ED doublet or triplet lens apochromats) easily cost 3-4 times more than an achromat. You can add a set of filters to a low cost achromat but possibly ending up spending a little fortune for filters that could buy an ED doublet APO. Large Ø120-150mm aperture F5 achromats are designed for visual tasks. No optical correctors exist for such scopes as not ideal for imaging. An option is a long focal length refractor, say about 1000mm which is way less prone to aberration but trades this merit against extended exposure time, narrower field of view and need for more accurate tracking. As for aperture, Ø50-80mm should work just fine, otherwise the cost increase per inch of aperture quickly brakes a bank. Watch out inacceptable optical quality with ultra-cheap refractors; they are, sorry to say, crap.
A few high quality products excepted, achromats are basically not recommended for astrophotography, but can help make you familiar with imaging without spending a fortune.

EXAMPLE: An achromatic refractor, Ø102mm FL600mm F5.9 for USD200 with tripod (as of Feb 2019).
• Refractors (Apochromatic)
Apochromatic refractors (APOs) use (two to four, sometimes five or six) extra low dispersion (ED) lenses with high permeability to minimize color aberration. There are basically four different types of apochromatic refractors in sequence of increasing optical performance:
- Doublet with two lenses
- Triplet with three lenses
- Quadruplet with four lenses (typically a triplet with an integrated lens for flattening the field of view)
- Petzval designs with 5 or more lenses
While in most cases doublets and triplets require an optional 'flattener' when imaging with large image sensors, such as full frame and APS-C, a quadruplet or Petval eliminates need for this extra purchase. Depending of course on manufacturer and model it is often more economical than a doublet or a triplet with an optional flattener. Also, most flatteners are designed for a specific focal ratio and telescope model only and are useless for other refractors.
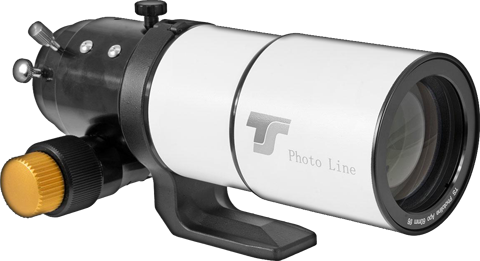
APOs are designed with imaging in mind. They feature rigid 2" to 3" focusers achieving an image circle of up to Ø44mm which fully illuminates DSLR sensors. APOs priced under 1000 USD sport up to Ø80mm aperture with 350mm to 480mm focal length (F5 to F7). Since quality lens glasses are employed, this category is excellent for starting with affordable astrophotography. Recently, small Petval APOs around Ø55mm aperture for wide field captures became popular for their high optical precision, wide image circle and cost performance, such as currently offered by Askar, Svbony, Vixen, William Optics, etc.
Ultra-portable APOs come with small apertures and can not provide high resolution, yet they do offer sharp images rich of contrast, especially when they employ quality lens glasses, such as 'FPL-53'. Their low weight and short focal lengths permit the use of portable tracking mounts (with autoguide control for imaging).
 The waning moon captured in detail with a low-cost 1/3-inch CMOS camera through a Ø71mm APO.

EXAMPLE: A quadruplet apochromatic refractor, Ø71mm FL 450mm F6.3 for USD 750 (as of Nov 2019).
EXAMPLE: An ED doublet apochromatic refractor, Ø60mm FL=360mm F6.0 for USD 425 (as of Nov 2019).
• Reflectors
The most common reflector achitecture is a Newtonian which is way lower in cost compared with refractors of same aperture as it employs parabolic or spherical mirrors which are cheaper to produce since there is only one surface that needs to be ground and polished. It has a secondary mirror held by a 'spider' which obstructs the aperture by some 30% (10% by area) or so in that a Ø130mm to 150mm mirror should work well for imaging.
As a major advantage for photography, a Newtonian is free of color aberration because light is reflected, not refracted. Due to mirror curvature reflectors are susceptible to coma at the edges of a view. For optimal results a fast Newtonian, say an F5, may require a 'coma corrector' in order to produce nicely rounded stars in image corners, especially on 'full frame' wide camera sensors. On 'cropped' sensors the worst of the coma will be off of the edges in that a corrector may not be worth while spending some USD 200, yet basically a reasonable investment in view of the lower prices of Newtonians. Newtonians produce diffraction spikes around bright stars which do not look astronomical but often very beautiful.
The back focus and focus travel of a reflector is typically shorter than that of a refractor in that it is wise to make sure that your camera will reach focus preferably without additional lenses or extension tubes. Unlike refractors, the optical axis of a Newtonian tends to shift by usage time resulting in distorted images. Accurate adjustment requires a tool known as 'laser collimator' or 'collimation eyepiece' which is an extra purchase. After all, Newtonians offer the best value per inch of aperture and are most satisfactory instruments for astrophotography. Absence of color aberration makes a Newtonian comparable with a quality apochromat refractor, but at a third of the cost. In plain English, "most bang for the buck".
 The advantage of larger aperture: Moon craters taken with a low-cost 1/3-inch CMOS camera through a 150mm reflector and 3x barlow lens.
 Composite of the Moon surface and planets to-scale taken with a low-cost 1/3-inch CMOS camera through a 150mm reflector and 2x barlow lens.

EXAMPLE: A Newtonian reflector, Ø150mm FL=750mm F5 optical tube with dual-speed focuser for USD 280 (as of Feb 2019).

EXAMPLE: A low-cost 1/3-inch CMOS camera produces exciting close-up images of the Moon and the Planets.
CMOS cameras have rapidly evolved within merely a few years. Click to enlarge an image taken with a PC webcam back in May 2019.

The larger the aperture of the telescope the more details can be resolved. This was possible in November 2023 with a dedicted planetary/lunar camera and an 8-inch (Ø200mm) Schmidt-Cassegrain telescope:

• Cassegrains
Catadioptric (or compound, combination of mirror and lens) Schmidt-Cassegrain (SCT) or Maksutov-Cassegrain (MCT) telescopes typically come with a mirror of long focal length, mostly 10 times the aperture in millimeters, which equals an F10 ratio, yet they are physically the shortest tubes. The resulting narrow field and longer exposure times disqualify this type for wide field deepsky imaging but are optimal for lunar and planetary work with astrocams. With precision tracking and guiding on sturdy mounts, SCTs with large aperture starting at 200mm (8 inches) are great for closeup imaging of deepsky objects, galaxies in particular. For instance a large 12 inch (305mm) F10 SCT has a focal length of 3050mm which results in a 0.44° field of view on a APS-C camera sensor which is a little less than the width of a full moon disk. Since focus is adjusted by moving the primary mirror the focal length slightly changes with mirror position.
Like a Newtonian, a SCT eliminates chromatic aberration but has coma and field curvature, too. The image circle (over 60% equal light intensity) of an SCT is hardly Ø30mm wide, resulting in notable vignetting, calling for a focal reducer/flattener when using a large CMOS camera or a DSLR.

EXAMPLE: A Schmidt-Cassegrain, Ø150mm FL=1500mm F10 optical tube seen for USD 400-600 (as of Feb 2019).
Advantage of 'Short' and 'Fast'
With short focal lengths errors in tracking and guiding are less noticeable, but critical at long focal lengths (narrow field of view). For this reason, novices are best advised to use a short focal length and enjoy wide field photography. The shorter the focal length, the 'faster' the focal ratio of a scope with given lens or mirror aperture and the more light it collects within a given time hence requiring shorter exposure times which forgive tracking errors or a rough polar alignment.
Optical Error Correction

The dark side of 'fast' short focal length telescopes is field curvature and aberration requiring corrections by means of lens units known as "field flattener" (for refractors) and "coma corrector" (for Newtonians) which compensate for optical imperfection. Long focal length scopes are way less prone to aberration, eliminating need for correcting optics, however, as the worse light collectors they demand longer exposure times and higher tracking accuracy because of the narrower field of view.
Why would your telescope need a correcting device? The simplest explanation is, both lenses and mirrors are of curved shape, a lense is 'convex', a Newtonian mirror 'parabolic', while a camera sensor is flat. The additional parts correct the light path so that the image on the sensor is flat and pin-point all over thus avoiding oval stars (comatic aberration) at the image edges. This correction is welcome for photography but less important for visual observation. Most correctors also reduce the focal length of the optical system, however, this is no significant advantage for anyway short focal length telescopes. A corrector may sacrifice a little contrast, is typically optimized for specific telescopes and focal ratios. It will be useless on your next telescope.
Back Focus
A "back focus" of 55mm is a well established industry standard for DSLR T-rings. The height of T-rings is often matched to the given back focus of a DSLR-camera to obtain the 55mm distance as accurate as possible. Typically, a camera with a T-ring on has 55mm distance between the front of the T-ring and the sensor, namely the "back focus". For instance, a Nikon APS-C (cropped) DSLR has a typical backfocus of 46.5mm on the camera housing, plus T-ring height = 55mm. T-rings are Ø42mm or Ø48mm threaded to accept an adapter that threads or inserts into a focuser sleeve. While Ø42mm are sufficient for fully illuminating APS-C sized sensors, Ø48mm are required for full frame sensors, while a telescope should provide at least a Ø44mm image circle to avoid vignetting. The Baader MPCC Mark III coma corrector for instance does not alter the focal ratio of a Newtonian and is designed for a back focus of 55mm (+/-1mm). When, after removal of a ring, a Ø48mm T-ring is used, then the back focus increases to 57.5mm.
Light Collector
In combination with an eyepiece (ocular), a telescope magnifies a view but is primarily a light collector with ability to collect a lot more light than the human eye. The light gathering power of an aperture with 150mm compared to an adult pupil diameter being 7mm is given by (150/7)² = 460, while twice the aperture, 300mm, gathers about 1840 times more than a human eye. This is 4 times more than a 150mm aperture collects! A lens or mirror twice as large as another captures 4 times more light.
Likewise aperture dependent is the capability of splitting binary stars (resolution) which is determined as 138/aperture in mm. Also called "resolving power", a 150mm aperture scope is theoretically capable of splitting two stars 0.92 arc seconds apart, while a 300mm tmirror splits stars as close as 0.46 arc seconds apart. The multiple star Mira is currently 0.46 arc seconds away from its component in that the minimum aperture should be 138/0.46 = 300mm to resolve the pair - theoretically.
In reality, even the largest ground based telescopes cannot resolve finer than 0.5 arc seconds due to atmospheric turbulences.
Lens based refractor apertures typically end with 6 inches or 150mm, simply because of production cost and weight. Telescopes beyond six inches aperture are usually Newtonians and Cassegrains. The Hubble Space Telescope too has a mirror - 2.4 meters across.
Basic Optical Architectures
Achromat Refractor

Newtonian Reflector

Schmidt-Cassegrain

Conclusion
Refractor or Newtonian, the choice of which depends on your budget, expectation and preferences regarding manufacturer and design-inherent pros and cons. If your choice is a refractor, a small ED doublet or triplet apochromat capable of minimizing color fringes would be preferable. If you find even little color fringes a nuisance and do not mind to periodically adjust the optical axis, then pick a Newtonian around Ø130mm, optionally with a coma corrector. Be sure that the Newtonian is optimized for imaging (focuser positioned closer to the primary mirror).
If you can afford it, look for a telescope with a rigid dual-speed focuser that will help focus faint objects less painfully. Also check bundled accessories, some of which make sense, while others do not. Some telescopes require no extra parts for focus except a T-ring for a DSLR while others require mostly optional extension tubes. The lesser parts in between the telescope's focuser and camera the better for compactness, stability and a tilt-free optical axis which is crucial for imaging.
A purchase of too cheap equipment often results in an upgrade purchase ending up in higher total expenses, or loss of interest. On the other hand, if the goal is merely to practice imaging with a DSLR without being too much concerned about color aberration, then a setup such as introduced further down this page is excellent entry level gear for the cost, weight and size without regret. To reduce chromatic aberration in achromats, you can use a "fringe-killer" filter designed to reduce the violet and ultraviolet wavelengths of light, which are the primary culprits of chromatic aberration.
Camera
Most common are DSLRs which offer selectable exposure times up to 30 seconds and bulb exposure mode. Since astro-imaging merely requires manual camera mode and infinite focus, without need for CPU control of lenses, a used or partly defect DSLR would do the job. Most common entry-level DSLRs sport an APS-C sensor chip which measures about 24 x 16mm with up to 6000 x 4000 pixels, which is more than sufficient for the hobby. Special features, such as noise reduction and in-camera image processing are dispensable as this can be done much better with image post-processing software. A vari-angle (tilt and swivel) LCD monitor would be great for comfortable working. A touch screen is a nice touch, though not essential for our goal, but the reduced mechanical wear on buttons and rotary switches, etc. can extend the camera's lifetime. Anyway, if you do not already own a DSLR, try and find a used camera body.

|
Camera SensorsSay, we have a telescope with a Ø44mm image circle, wide enough to fully illuminate a full frame DSLR sensor (36mm wide) without edge vignetting and a focal length of 750mm. This scope will also fully illuminate a smaller sensor, such as the more common APS-C (23.5mm wide). The 'crop factor' 36mm/23.5mm = 1.5 has the effect of apparently extending the focal length to 750mm x 1.5 = 1125mm because the smaller sensor is like a smaller field of view. Equally, one can say that the smaller sensor magnifies 1.5x.The field of view (fov) as a function of sensor dimension (sw) and focal length (fl) is: fov = 2 * atan(sw / (2 * fl)) Example APS-C: 2 * atan(23.5mm / (2 * 750mm)) = 1.8° Example Full Frame: 2 * atan(35.9mm / (2 * 750mm)) = 2.74° |
Starscape & Constellation Photography
 Jupiter shining like a beacon in the the Milky Way.
Nikon D5300 with 28mm F2.8 lens. 13 exposures of 30 sec each at ISO 1600.
Jupiter shining like a beacon in the the Milky Way.
Nikon D5300 with 28mm F2.8 lens. 13 exposures of 30 sec each at ISO 1600.
You can take beautiful photos of the constellations and the Milky Way with a standard camera lens and a tripod, without telescope and tracking. Note, that a lens does not need to support autofocus and other control functions. As long as the iris can be changed and focus set to infinity, a used or partly defect lens will do. If you are living in a brightly illuminated area, consider a light pollution filter for your lens. For wide field starscape and constellation photos a lens focal length between 24 and 50mm will be fine. The aperture should be at least 1:4 or wider. A 100-200mm telelens can capture large deepsky objects, such as the Andromeda galaxy and the Rosette, North America and Orion nebulae. However...
...for telelenses and exposure times exceeding a few seconds, a mobile tracker typically seated on tripods helps avoid star trailing with telelenses. Another fine choice is Sky-Watcher's Star Adventurer series as are trackers from iOptron, Fornax, etc.
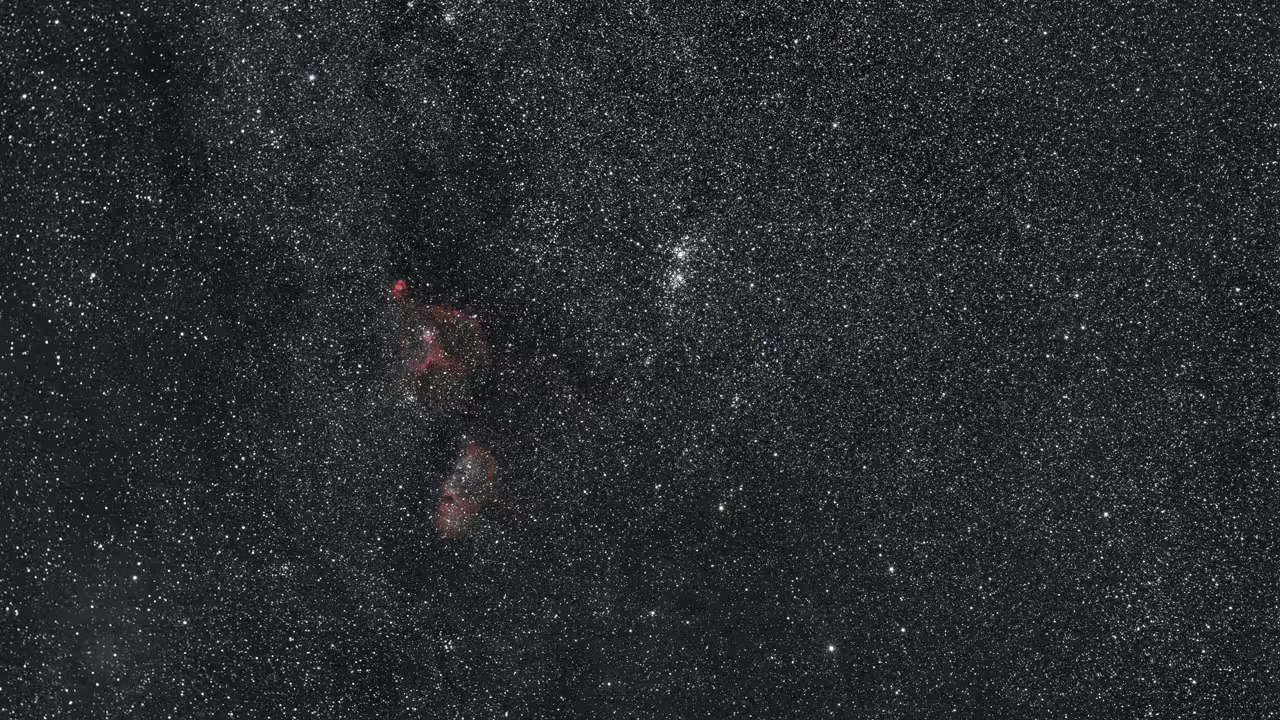 Heart & Soul nebulae and the Double Cluster.
Nikon D5500 with 50mm F2.8 lens. 195 exposures of 60 sec each at ISO800.
Heart & Soul nebulae and the Double Cluster.
Nikon D5500 with 50mm F2.8 lens. 195 exposures of 60 sec each at ISO800.

EXAMPLE: The oldtimer Pentax *istD with an APS-C sized 6000 x 4000 pixel sensor has everything essentially needed for manual mode, except a vari-angle (tilt and swivel) monitor. The model is from 2003 and good for wide field imaging with fast telelenses.

EXAMPLE: The Nikon D5300 was launched in 2014. The body with an APS-C sized 6000 x 4000 pixel sensor weighs only 480 grams. It features long battery life, excellent noise performance and has all functions required for astro-imaging, plus a vari-angle (tilt and swivel) monitor. The later D5500 model contains the same sensor and sports a touch panel.

EXAMPLE: A mobile tracker for cameras. Further required are a tripod, a ballhead and two AA batteries.
Camera Lenses
If you own a DSLR bundled with a lens, a tripod and a tracker, then you are ready to go for wide field imaging. Prime lenses are preferable over zoom lenses as they typically provide crisper star images.
• Telelens
Example: With its 135mm focal length, the Samyang/Rokinon all-manual telephoto prime provides a desirable 10° horizontal field of view with a crop sensor DSLR (APS-C) and 15° with a full frame sensor for wide field deep space photography. At maximum aperture of f2.0 short exposure times are possible yet pin-point sharp in the corners without coma or aberration.
One of its lenses (11 elements, 7 groups) is an extra-low dispersion (ED) element to reduce the impact of chromatic aberrations (color fringes) while full Ultra Multi-Coating (UMC) considerably helps reduce flare and ghosting. The lens comes with bajonet lock for major camera brands. With a long 200° of rotation the focusing ring has a good touch and feel, smooth and without play while holding its focus well. The lens aperture is Ø67mm, the front filter thread size is the popular Ø77mm, say, for a light pollution filter. In other words, a fine astrophoto lens which easily rivals, often outperforms, a fully corrected short-focal-length apochromatic refractor.
• Standard Lens
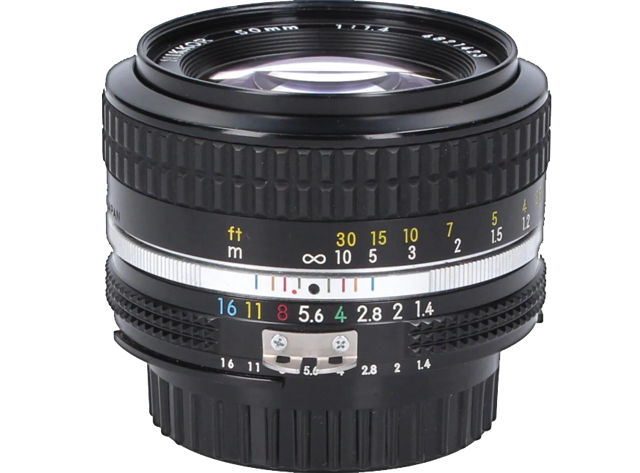
Example: The Nikkor 50mm, f1.4 is a "fast", low-cost standard lens designed for manual mode and is often bundled. The field of view on an APS-C sensor is about 27° x 15° which is well suited for many constellations, though a wider 35mm, 28mm or even a 14mm lens would be favorable for large constellations. The lens threads Ø52mm filters. With its iris wide open at f1.4 the stars in the image corners get strongly elongated, in that it is recommended to stop the lens at f2.8 or f4.
The "faster" the lens (the lower the f-value), the more light a lens can collect during a given exposure time. With either lens, a filter to reduce the impact of light pollution (LPR) threaded to the lens is warmly recommended in light flooded places even though the filter drops (darkens) by around +1/2 stop (Example).
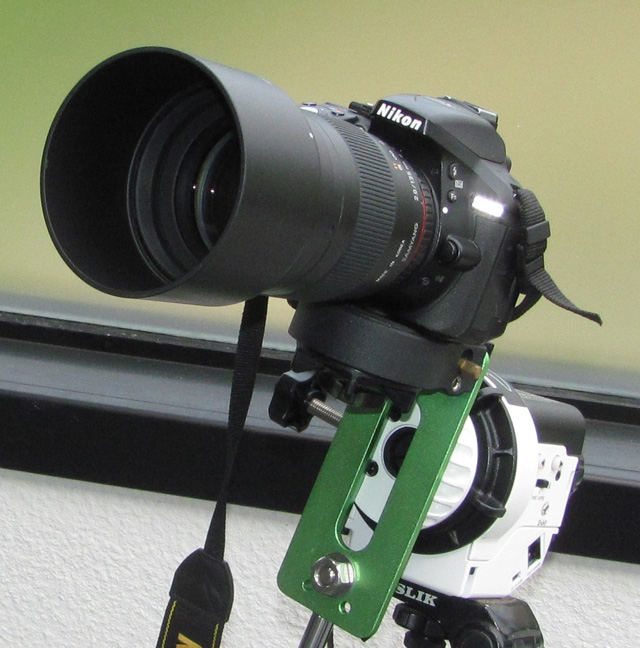
Nikon D5300 and a Samyang 135mm telelens tracked on a Sky-Watcher “Star Adventurer” mobile tracking mount which is capable of autoguiding in a single direction (in RA).
NOTICE: Inherent to the shape of the iris spikes apprear around stars when the iris is not wide open. To avoid spikes wide open the iris and use a stepdown ring, such as a Ø77mm to Ø52mm for the Samyang 135mm. The resulting f-stop is 135mm/52mm ≅ 2.6 which is still very "fast".
Accessories
You will need an adaptor which connects your camera to a telescope focuser sleeve, a so-called T-Ring (Ø42mm or Ø48mm) which threads to the telescope on one side and on the other with a bayonet lock for your camera model, Canon, Nikon, Pentax, Sony, Fujifilm, you name them. Depending on the type and make of the telescope you may need an extension tube or a converter to reach focus. Alternatively, the camera can be inserted into the focuser in place of an eyepiece by means of a nose piece that fits the T-ring thread diameter. A nose piece is typically threaded for 1.25" filters.

Startup Kit

Coatings
A blue, green, or purplish tint is a sign of optical coating. Simplified definitions are:
- Coated: at least one optical surface has a single layer coating.
- Fully Coated: all surfaces have a single layer coatings.
- Multi-coated: at least one surface has a multi-layer coating.
- Fully Multi-coated: all surfaces have multi-layer coatings.
As a result of scattering and reflection, every uncoated air-to-glass interface equals to about 8% loss of light transmission for each tier. For instance, a doublet refractor with four air-to-glass transmissions including a very simple eyepiece looses 100% - ((((100%*.92)*.92)*.92)*.92) = 28.4%. Optical coatings with continously improving efficiency significantly help maximise permeability by reducing scattering and reflection.
First Attempts
When your gear is set up and firmly seating on a tracking mount and if the season is good for the constellation of Orion, the most rewarding object for a first attempt is without failure the Great Orion Nebula (Messier 42). Other first choice objects are the Andromeda Galaxy (Messier 31), as well as the Trifid (Messier 20) and Lagoon (Messier 8) nebulae in Sagittarius. Likewise easy targets are open star clusters, not only the famous Pleiades, but also Messier 35 in Gemini and by all means the Double Cluster in Perseus (Caldwell 14). Later, depending on the season, try the North America nebula (NGC 7000) in Cygnus, the Rosette Nebula (NGC 2244) in Monoceros and the Flame Nebula (NGC 2024) in Orion next to the bright star Alnitak and the Horsehead Dark Nebula.
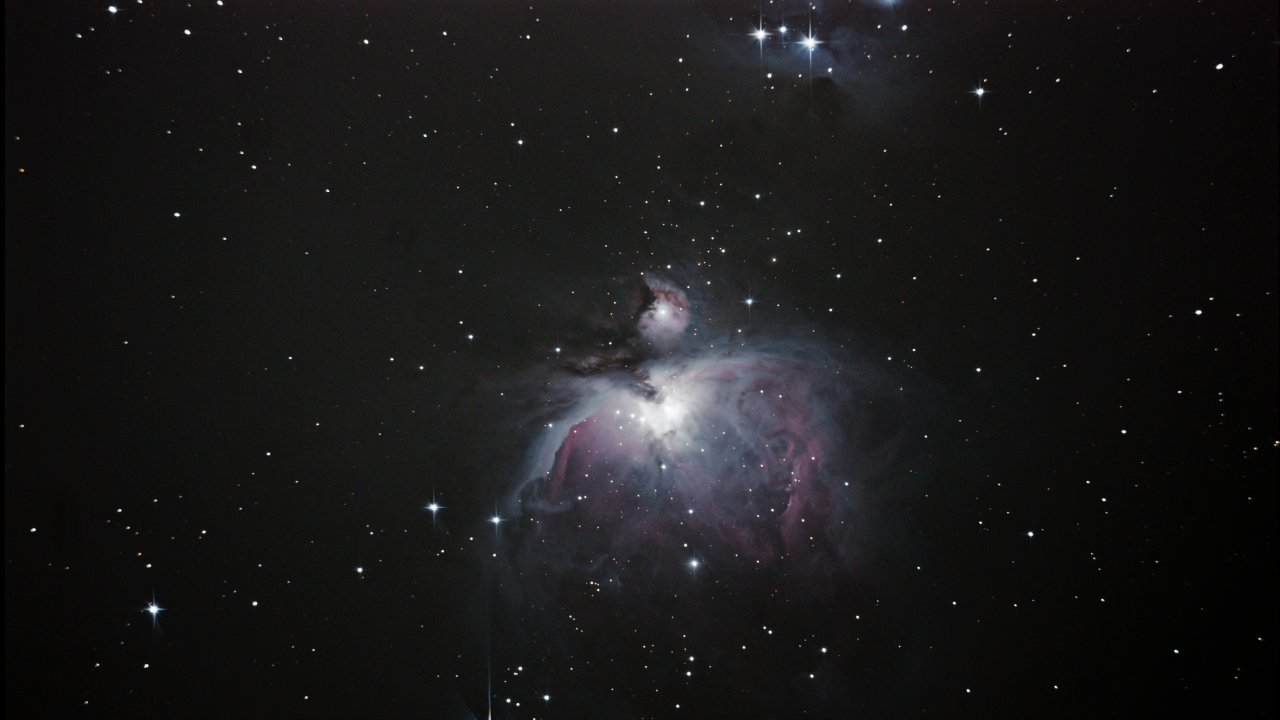 The Orion Nebula processed from a stack of 40 frames, 10 seconds exposures each at ISO3200 with a Nikon D5300 through an Ø150mm FL 750mm F5 Newtonian.
Single exposures of, say, 30 seconds at ISO 3200 look nice on the camera's small LCD but coarse and noisy on a PC monitor. In order to minimize noise and to bring out detail, you need to take at least 100 exposures (light frames) and use software to 'stack' them, such as the popular "Deepsky Stacker" or "Siril". A so stacked image will then need to be further processed in image processing software which will tweak the most out of your image file, though it will require some doing and experience.
 Courtesy: Pixelbay.com
Where to Photograph
Obviously, the best location is a place under a darkest possible sky. Sadly, this is a luxury in our not only 'light-polluted' planet for which many have to move tens, sometimes hundreds of miles. Imaging under light pollution is still possible and rewarding provided you add filters and shoot as many as possible exposure frames. Experienced astro-photographers have come up with brilliant images taken in their 'light flooded' backyards followed by extensive image processing on the PC. As long as you are not tied to the middle of a city, it is manageable, indeed, and becoming easier the more routine you will gain. Astrophotography is an open end learning experience where frustration meets enjoyment.
Please, do not dispair should your images look like washed out. You will be taking image frames exposed for several tens of seconds. Within this time atmospheric turbulences and poor seeing can ruin your images in spite of pin-point focus and accurate tracking. Since the light of target objects at low altitude travels a longer way through the atmosphere you should wait until it reaches maximum elevation as the object crosses the meridian. If all odds are against you, try again when conditions improve. Oh yes, and please stay away from roads, not only because of bright head lights.
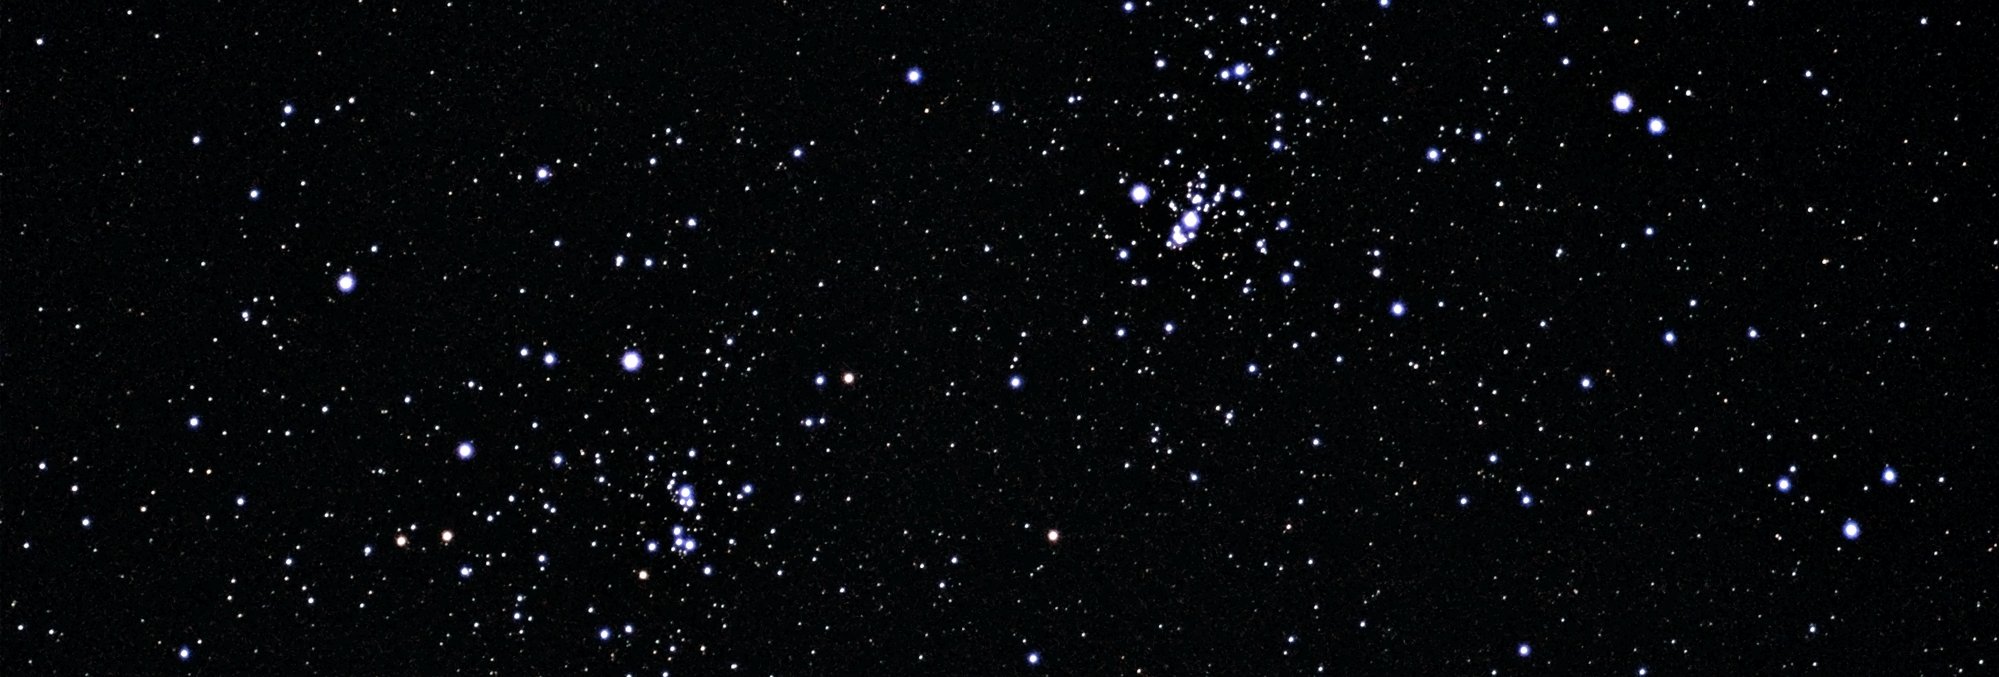 Double Cluster Caldwell 14 in Perseus with a Ø80mm/FL 910mm achromat.
Please feel free to use this website's field of view simulator to verify how much of sky you can photograph with a given DSLR and focal length of a lens or telescope.
Anyway, do not rush because it is clear and new moon but carefully explore all options. A dealer partner you can trust is worth gold. Astronomy clubs, star parties, telescope dealer shops and exhibitions are good opportunities to try and clarify details before you buy. In particular star parties are fantastic for collecting unbiased information and -- for socializing.
www.astropical.space
No liability whatsoever assumed.
Work in progress, please stay tuned. Feedback regarding experience with low-cost equipment alongside 'real-life' images is most welcome.